Remote notary authentication via facial recognition
Estonia is pioneering a new administrative breakthrough thanks to technology. There are few things that require the presence of a notary in Estonia, almost everything can be done online through electronic signature.
However, even for those cases where a notary is required, Estonia allows now remote notary authentication via facial recognition.
What is notary authentication?
Remote authentication enables notarial acts to be performed by means of a video conference between the notary and the customer. Such authentication is equivalent to a physical authentication at the notary’s office.
Not all notaries allow remote authentication, as it is not a requisite, but an option. It is up to the notary to decide if a specific transaction can be carried out by using remote authentication.
Subject to agreement with a notary, transactions using remote authentication can be carried out at a place suited for the customer (e.g. at home) or at an Estonian embassy.
Outside embassies, remote authentication can be used to perform all notarial acts.
At Estonian embassies remote authentication can be used for:
- carrying out transactions with shares of a private limited company,
- authenticating powers of attorney
- submitting applications for marriage and divorce
- applications related to succession
- deletion and transfer of real rights
- commercial pledges
Remote authentication cannot be used for:
- getting a marriage certificate
- a divorce act
Acts using remote authentication can be conducted in the following Estonian embassies: Helsinki, Stockholm, Brussels, Riga, and London.
How it is done?
To carry out a notarial process by remote authentication, first you need to establish which process or documents are going to be notarized.
Contact a notary
To conduct an act using remote authentication, we advise you to first contact a notary’s office. There is a list of all Estonian notaries at https://www.notar.ee/en/notaries/list.
Self-service portal
You can use the self-service portal of the Chamber of Notaries by following these steps:
- Access https://tara.ria.ee/login?ui_locales=en
- Log in with a Republic of Estonia ID card, digital ID, mobile ID, or an e-resident’s digital ID
- If the intention is to carry out the act by using remote authentication in an Estonian embassy, one of the five embassies can be selected in the self-service portal, by also indicating the desired dates.
- Based on the data submitted in the application the self-service portal proposes the available times that suit both the notary and the embassy. The times are proposed in accordance with the time zone in which the embassy is located.
- 24 hours before the scheduled beginning of the transaction to be conducted by remote authentication, the message „The time of conducting a transaction via remote authentication is approaching” is displayed in the section „My transactions”.
- Before starting to conduct the transaction, the user can confirm their readiness for remote authentication by clicking on the option “I confirm that I am ready for remote authentication” (This option becomes available about 15 minutes before the scheduled beginning of the transaction).
- In order to carry out a transaction using remote authentication at an embassy, the party has to go to the embassy, where the relevant official ascertains the identity of the party. Thereafter the party can use the embassy computer to log in to the self-service portal.
- Upon logging in to the self-service portal, the user can examine the transactions they have under way.
- At the time agreed with the customer the notary launches the transaction via video bridge. The notary explains the transaction to be authenticated via the video call, the parties can communicate with the notary and ask questions.
- In order to examine the data of the act, the notary displays the document on the screen, which can then be studied.
- After the document has been examined, the notary makes it available for the parties so that they can sign it.
- The document can be signed only in the environment for remote authentication; to do so, the parties must click on the option “Sign” and then add their signature.
- After the document has been signed by all parties, the notary signs the document as well, thus bringing the process of remote authentication to an end and the document becomes available for the parties via the self-service portal.
What is the cost?
The notary fee for using remote authentication is 24 euros (includes VAT).
Pdf guide
Download the Customer Guidelines for Remote Authentication.
Facial recognition
The Veriff Facial Recognition Programme is used to identify parties conducting notarial acts using remote authentication.
How does it work?
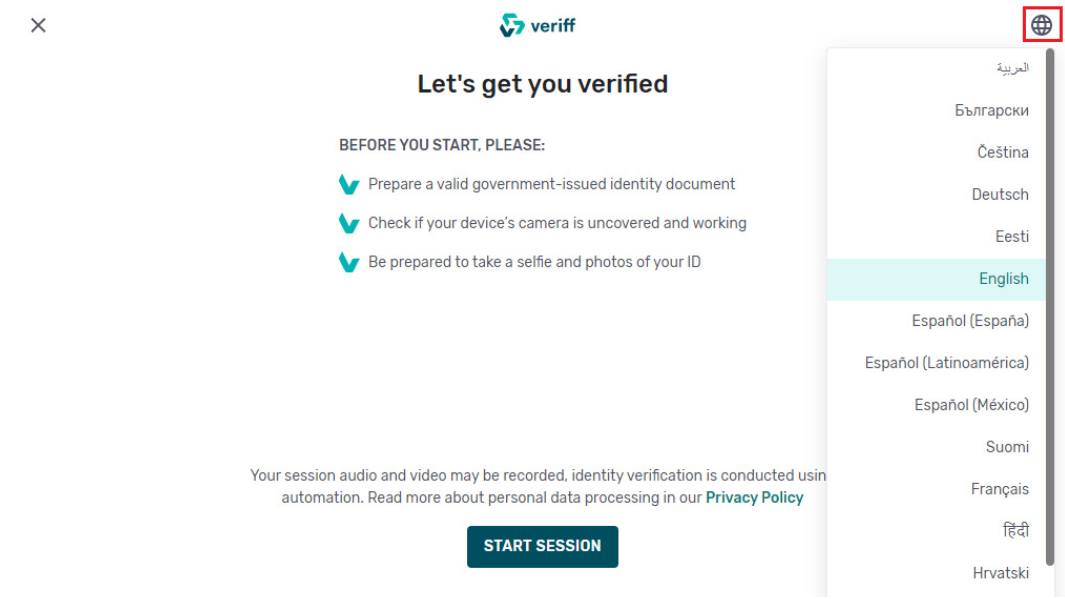
- About 15 minutes before the scheduled time of the transaction, when the customer logs in to the self-service portal, they can confirm they are ready to be identified through remote authentication by clicking on the option “I confirm that I am ready for remote authentication”. This is followed by the option “COMMENCE FACIAL RECOGNITION”.
- Click on this message to be redirected to Veriff’s web page.
- The website will be displayed in the language that was used in the self-service portal, but it can be changed if needed. Then, you are ready to start the facial recognition process.
- You have to choose the state issuing your identity document and the type of the identity document to be used as a basis for facial recognition. After selecting the type of document, you have to follow the instructions of the program and make some photos using your computer’s camera. An original document (not a printed copy) must be used for the facial recognition to be successful.
- If you have logged in to the self-service portal by using an ID card (such as an Estonian residency ID), it can be removed from the card reader for the duration of facial recognition and used for identification purposes. Don’t forget to connect it back again when you finish!
- Once all the steps have been taken, the program will notify you that the verification is underway. You will be redirected back to the self-service portal to wait for the results of facial recognition. While waiting, please do not leave the self-service portal, otherwise, the facial recognition process will fail.
- If facial recognition fails, the reason will be displayed, and you have the option of trying again by clicking on “COMMENCE FACIAL RECOGNITION” again.
- Once the facial recognition verification is successful, the information will be sent to the notary and the remote authentication process can start.
Frequently asked questions
The following web browsers support the self-service portal, provided that the ID card software has been installed and its use permitted:
- Google Chrome
- Firefox
- Microsoft Edge
The following web browsers CANNOT be used:
- Internet Explorer
- Safari
It is possible to use a desktop or laptop computer equipped with a web camera, with the microphone and sound functions switched on.
In order to create a stable internet connection for carrying out a transaction with remote authentication, a cable internet connection speed of 30Mbit/s and uploading speed of 15Mbit/s is required.
If remote authentication is carried out via video bridge, the computer should not be in a network protected by a firewall; the remote authentication video server at irbis.rik.ee (213.184.54.164) requires connectivity over the TCP and UDP port range of 1024 to 65535 in both directions.
If the video bridge fails (the video image is black), you should try refreshing the web browser by clicking the „Refresh” button on the screen or pressing F5 on the keyboard.
If there is no sound or your own video image is not visible, you should check the settings of the web browser to see if access to the microphone and camera is allowed. The privacy settings of the operating system ought to be checked as well to make sure that the applications have been granted permission to use them.
In order to sign a contract, the „Sign” button must be clicked in the self-service portal. The contract can be signed by using the Estonian ID card, digital ID, mobile ID, Residence permit card or an e-Resident’s digital ID. The ID card plugin must be installed in the web browser in order to use the ID card for signing.

Ignacio Nieto is the CEO and co-founder of Companio. He’s also a freelance developer, composer, and writer. You won’t find him on Social Media. Still, you may see his name in articles about entrepreneurship and the digital nomad lifestyle.